How To Download BHIM
You can download the BHIM app from the Google playstore. Since, UPI system works on the Android platform, you would not find BHIM app for iPhone or windows phone. However, in future, you would expect the BHIM app for iPhone as well.
To get the BHIM app from the Google playstore search for ‘BHIM by national payment corporation of India’. Beware, as there are many fake apps in the name of BHIM. You may also see the Chhota Bheem apps. Hence look for the author. It should be ‘National Payment Corporation of India’. You can also use the following URL to directly download BHIM app.
https://play.google.com/store/apps/details?id=in.org.npci.upiapp
How To Use BHIM
Install and Set Passcode
- To use the BHIM App, you have to download and install it.
- When you open this app first time, it would ask you to choose the language. Currently you have the option of English and Hindi.
- It would also tell you some basic features of this app.
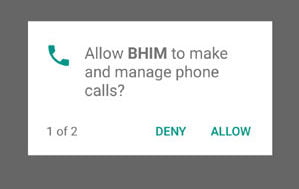
 In the next step, the App would ask your permission to send and view SMS from your Phone. It is necessary to verify your phone number.
- It may also ask to choose the SIM if you have two SIM in your phone. You should choose the number which is linked to the desired bank account.
 Now You have to set the Passcode/PIN to open this app. It would be a 4 digit PIN. Without entering this PIN, you would not be able to open this app in future. confirm the PIN again by entering it.
- Now you would reach to the dashboard of the BHIM.
 Add Bank Account
- Your first step in the BHIM dashboard should be the bank account linking. You need to link bank account to transfer fund from that account or get money to the account.
- Note, You can link only one account at a time in the BHIM app. Other UPI apps give you the facility to link multiple bank account.
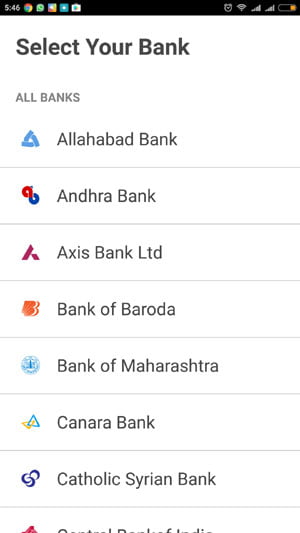
- To link bank account, you have to the choose the bank name from the given list.
- You would see your bank account/s of that bank. Select the account. It links the bank account to the BHIM app.
- Anytime, you can change your bank account by going through the same procedure.
Set UPI PIN
 UPI PIN is required for the final authentication, when you pay money to any bank account. The UPI PIN is the same PIN which is called as MPIN in other UPI apps.
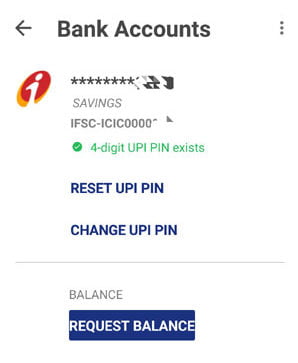
To set the UPI PIN, click on the Bank account.
You would see the linked bank account. Below the bank account, you would also see about the status of your UPI PIN in green fonts. If you have previously set the UPI PIN, there would be a message about this.
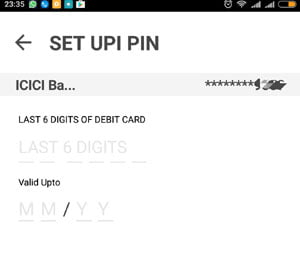
 There would be links to RESET UPI PIN and Change UPI PIN. If you choose the RESET UPI PIN, you need debit card details to authenticate. You would also get an OTP SMS for authentication.
Changing UPI PIN is relatively easy. You have to only enter the existing PIN and new PIN twice. That’s it.
 Send Money
Now you can send and receive money through the BHIM app.
- To send money, you have to click on the send money link.
- In the next step you have to enter the mobile number of payee. You can also enter the virtual payment address of the payee. You would not get any other option to pay. Other apps such as Baroda MPay give the liberty to pay money to bank account or Adhaar number as well.
- Enter the amount and remarks to send money.
- Finally, enter the UPI PIN. It is the same PIN which is used as MPIN with other apps. Once, you enter the UPI PIN, the money gets transferred to the bank account of the payee. You would instantly get notification about that.
Send Money Using Aadhaar
BHIM gives you facility to send money using the Aadhaar number. It is very easy you just require the Aadhaar number of the payee. Enter the Aadhaar number just like the VPA. It is enough to to transfer the money. However you must note that the benefeciary must his/her Aadhaar with any bank account. As you know that the money would go into the bank account. Today most of the people has linked their account with the Aadhaar.
Collect Money
To collect money Click on ‘Request’ on dashboard.
Again you have to enter the mobile number or VPA of the person from whom you want the money. Enter the amount and remarks and submit. As you submit the request, the payer would get a notification in his smartphone. By following the notification, the person can accept or reject the payment.
You can also generate the QR code to request payment. To generate QR code you have to only enter amount and remarks. The payer would scan this QR code and accept the payment.
Limitations of BHIM
There are certain limitations of BHIM. These can be a disadvantage for some people but because of these limitations BHIM app is very simple.
- You can add only one bank account at a time.
- You can have only two Virtual payment address. The first would be default containing your mobile number while you can set the second VPA.
Improvements Required
- It should give the flexibility to enlist multiple bank account.
- The app should fetch the mobile number from the contacts of the phone. The Phonepe app uses this feature. However,once you save a number for Future use, It would appear in the BHIM app itself.
- There should be a feature to capture QR code which is shared with you. You can’t scan such QR code.
Banks Available on BHIM app
Customers of these banks can use the BHIM app. There are 35 banks.
- Allahabad Bank
- Andhra Bank
- Axis Bank
- Bank of Baroda
- Bank of India
- Bank of Maharashtra
- Canara Bank
- Catholic Syrian Bank
- Central Bank of India
- DCB Bank
- Dena Bank
- Federal Bank
- HDFC Bank
- ICICI Bank
- IDBI Bank
- IDFC Bank
- Indian Bank
- Indian Overseas Bank
- IndusInd Bank
- Karnataka Bank
- Karur Vysya Bank
- Kotak Mahindra Bank
- Oriental Bank of Commerce
- Punjab National Bank
- RBL Bank
- South Indian Bank
- Standard Chartered Bank
- State Bank of India
- Syndicate Bank
- TJSB
- UCO Bank
- Union Bank of India
- United Bank of India
- Vijaya Bank
- Yes Bank Ltd
